Sunday 10 December 2017

Santa-tiser!


Hello my crafting friends!  Well I guess you can safely say we are well into the run up to Christmas now - I still can't quite believe it is the 10th December already!

I've made all sorts of Christmassy items this year, and as you may have already noticed I do like a Santa theme!  So this project shows my "Santa-tisers" - small hand sanitiser bottles in santa packaging - how could you not love that!?

This cute Santa packaging is also very easy to make!  For each one you need to cut cardstock to the following measurements:
~ red card 2" x 12", scored at 5.5" and 6.5", then punched at both ends with the scalloped tag topper punch.  Fold and decorate with the whisper white and basic black strips, stamps and silver foil buckle mentioned below
~ red card 1.5" x 6", scored at 1.25", 2.25", 4", 5" - fold and glue together and then glue to the decorated 2" x 12" piece of card to hold the sanitiser bottle in place
~ whisper white card cut into 1cm strips (and yes I know I am mixing metric and imperial measurements, but having been brought up with one, and then moved to another, so that is how I roll!)
~ basic black card cut into 1 cm strips
~ silver foil sheets cut into a buckle shape on my Brother Scan N Cut
Once all that is done tie up with a candy knot as I have done here, or a bow

Stampin' Up! materials used:
Stamps - Sweet Home
Card - Real Red, Whisper White, Basic Black, silver foil
Ink - Basic Black
Ribbon - Real Red stitched edge ribbon (sadly retired - I love it!)
Other - Stampin' trimmer, Simply Scored, Simply Scored metric scoring plate, multipurpose liquid glue  

If you would like to make this project, pop on over to my online store for everything you need!

Real Red 12" X 12" Card Stock
[124290]


Monday 4 December 2017

Stamparatus available for pre-order 5th - 31st December!


Woohoo!  Another pre-order window is about to open for the brand new Stamparatus!  If you missed out on the first reservation window, you'll be pleased to know that this time things are going to be a little different so many more people will be able to reserve one with deliveries starting from 19th March 2018.

  • The first reservation window was while supplies last - which was about 15 minutes! For the second reservation window, there is no maximum number of reservations and it will stay open from 5-31 December.
  • For the first reservation window the limit was 3 tools per demonstrator and 1 tool per customer. For the second reservation window, the limit is 1 tool per demonstrator and 1 tool per customer.
  • If you were lucky enough to order one in the first reservation window, you may also participate in the second reservation window.
  • In order to reserve your Stamparatus, you need to have a Stampin' Up! account (click here to set one up if you do not already have one) and you will need to provide your credit card information
So get ready for 9pm GMT on 5th December 2017, when you can pre-order your very own Stamparatus!

2017 Retiring Products and Year End Sale


Yes, it's that time of year again, when we have to say goodbye to lots of lovely goodies from the Stampin' Up! Autumn & Winter catalogue, with selected products available at discounted prices.

Here are a few of the favourite items that I will be sad to say goodbye to.  If you would like to take a further look at any of these, please pop on over to my online shop and get them while stocks last!


Wednesday 15 November 2017

Stamparatus - a new way to stamp!


Wow! It's a very exciting time for Stampin' Up!  It's the 10 year anniversary in Europe, and 30 year anniversary for the company in the US!  I have so much to share with you - from my weekend at the Stampin' Up! Onstage where hundreds of demonstrators get together to share ideas and inspiration, celebrate personal achievements and see all the new yummy goodies that will soon be available to purchase!

Today I want to tell you all about the NEW Stamparatus tool which really will change the way you stamp!  I have to say I can't wait to get my hands on one!

So, what is the Stamparatus I hear you ask!  It's a new stamping positioning platform that will help you achieve perfect results time after time!  Yes, you  may have seen similar tools available, but I promise you, when you see what you can do with this fabulous stamp positioning tool you too will want / need one!

Features include:
- compatible with Stampin' Up! red rubber and photopolymer stamps (and any other stamps you may have - as long as they are not mounted on a wooden block)
- a foam mat to use with photopolymer stamps
- rulers and gridlines for quick measuring
- 2, yes 2! open sides so that you can stamp onto large card or paper
- 2 reversible and movable plates, giving you 4 surfaces to work on at any one time
- 2 large magnets to hold paper in place (yes it has a magnetic base)
- magnet storage areas to make sure you don't lose them!

So, onto how you get yours!  Starting Thursday 16th November 9pm GMT through to the 30th November (or earlier if the reservation quantities are met) you can reserve a Stamparatus here for delivery in February 2018.  There is no payment required until your reserved Stamparatus is available for you, and if you miss out on this reservation window, there will be others before it is available from the main 2018-19 catalogue, but I promise you, you will want one before then!

If you need a bit more info on how you can use this tool take a look at this Stampin' Up! YouTube video

Well, I don't know about you, but I will be sat in front of my pc tomorrow night ready to reserve my Stamparatus!  Yes, that is right, you get to reserve yours at the same time as us demonstrators!  I hope you will join me and reserve yours here!

If you have any questions on the Stamparatus, or any other Stampin' Up! products you can email me at mandy@stampwithpaperpanda.co.uk or message me via Facebook
 

Sunday 8 October 2017

Christmas Tea Sachet Holders


Hi!  I have a Christmas make to share with you today - some tea bag sachet holders.  I think these will make a lovely little stocking filler present or teachers gift, and they are very quick to make.

Stampin' Up! materials used:
Stamp sets - Merry Little Labels, Labels to Love
Designer Series Paper - Quilted Christmas
Punch - Everyday Label, Corner Punch (retired)
Ink - Real Red, Garden Green
Card - Whisper White
Ribbon - gold 1/8" ribbon
Other - Simply Scored, hole punch 


Punch Corner Project Life
[135346]

Sunday 1 October 2017

Designer Series Paper Sale


We have another fab offer for - one that lasts all through October.  If you buy 3 packs of selected Designer Series Paper (DSP), you get to choose another one free.  The selection includes packs from the Annual and Holiday catalogue so there is a fab choice - so why not pop on over to my online store and treat yourself!


Celebrate World Card Making Day - special offers!


October 7th is World Card Making Day, and to celebrate Stampin' Up! have taken 15% off on a selection of stamps and notecards.  There is also an offer on adhesives - if you buy a fast fuse adhesive you get two refills free!

Here is the selection on offer, you can find these in my online store as these offer prices, but only until the 10th October!


Thursday 7 September 2017

Something Old, Something New - Nailed It meets Stitched Shapes


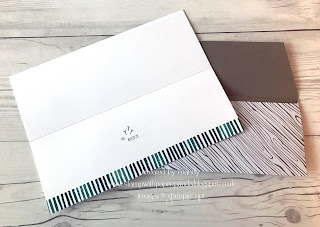
So its Thursday which means time for a Something Old, Something New post!  I made this card to say congratulations on exam results, and just knew that I had to use a sentiment from the retired Nailed It stamp set.  As the card is for a teenage boy it had to look masculine, so no pretty flowers or anything on this one, so I decided to use the Letters For You stamps and matching dies along using green and brown colours.

The Large Letters framelits are, as they suggest, well large... so to say congrats meant a larger card than normal.

I took a piece of A4 and scored it in half long ways, trimming off a small amount so that I could make an envelope from a piece of 12x12 paper.  I was following a colour pattern for the letters, but as you can see I clearly got that wrong with the last two! 

The border was made using a stamp from the Playful Backgrounds set, stamping off but not pressing too hard so that I got a variable depth of colour in the second stamping.  I stamped this on a fresh piece of card so that I could trim it down and have nice straight edges to the border.

On the inside of the card, and where the inspiration all came from is the sentiment "You Nailed It" and the nail image.  The You is from a longer phrase, which I masked off so that I just used the "You" so that it was all in the same font.  It does look quite small on the card - but that left me lots of room for my message!

Hope you have enjoyed this little look at using the old with the new and find time to get all your stash out and play!

Stampin' Up! materials used:
Stamp Sets -  Playful Backgrounds, Letters for You, Nailed It (retired)
Dies - Large Letter framelits
Inks - Tranquil Tide, Soft Suede, Bermuda Bay
Card - Bermuda Bay, Whisper White, Whisper White Thick, 2015-17 In Color Envelope Paper (retired)
Other - Big Shot, Stampin' Trimmer, Fast Fuse, Stampin' Dimensionals 

Nailed It Clear-Mount Stamp Set
[143077]
2015-2017 In Color Envelope Paper
[138312]